[Tutorial] Building a Minimal Highly Available k3s Cluster from Scratch
Author's Note
This article is reprinted from my blog, original article: 【教程】从零开始搭建最小高可用 k3s 集群
Before we begin, please note the following:
- The development environment used in this article is ArchLinux + Fish Shell. Since command syntax may not be fully compatible across systems, please adjust command formats according to your actual situation.
- The commands in this article depend on various CLI tools (marked in the text or already installed in prerequisite tutorials; common Linux CLI tools will not be marked here). Since the installation process for CLI tools is tedious and installation steps differ across platforms, we will not elaborate further. Please refer to the official documentation for installation tutorials.
Introduction
As we all know, k3s is a lightweight Kubernetes distribution developed by Rancher Labs, and is currently the most popular K8s lightweight solution.
Compared to traditional operations methods (1Panel/Baota/SSH, etc.), k3s has a steeper learning curve and requires understanding more container orchestration concepts. However, once mastered, you will gain:
Core Advantages of k3s
- Lightweight and Efficient - Single binary file, memory footprint < 512MB, perfect for low-spec VPS
- Production Ready - Fully compatible with Kubernetes API, smooth migration to standard K8s
- Declarative Operations - Describe desired state with YAML, system automatically maintains it
- High Availability Guarantee - Automatic failure recovery + multi-node load balancing
- Out-of-the-Box - Built-in networking, storage, Ingress and other core components
Through k3s, we can integrate multiple cheap VPS into an enterprise-grade highly available cluster, achieving automation levels difficult to reach with traditional operations.
Target Audience and Preparation
Suitable For
- Developers with some Linux foundation
- Those wishing to transition from traditional operations to container orchestration
- Tech enthusiasts wanting to build personal highly available services
Prerequisites
- Familiar with Linux command-line operations
- Understanding of Docker container basics
- Basic networking knowledge (SSH, firewall)
Learning Outcomes
After completing this tutorial, you will master:
- Using k3sup to quickly deploy k3s clusters
- Understanding the role of k3s core components (API Server, etcd, kubelet, etc.)
- Replacing default components to optimize performance (Cilium CNI, Nginx Ingress, etc.)
- Deploying your first application and configuring external access
- Basic cluster operations and troubleshooting techniques
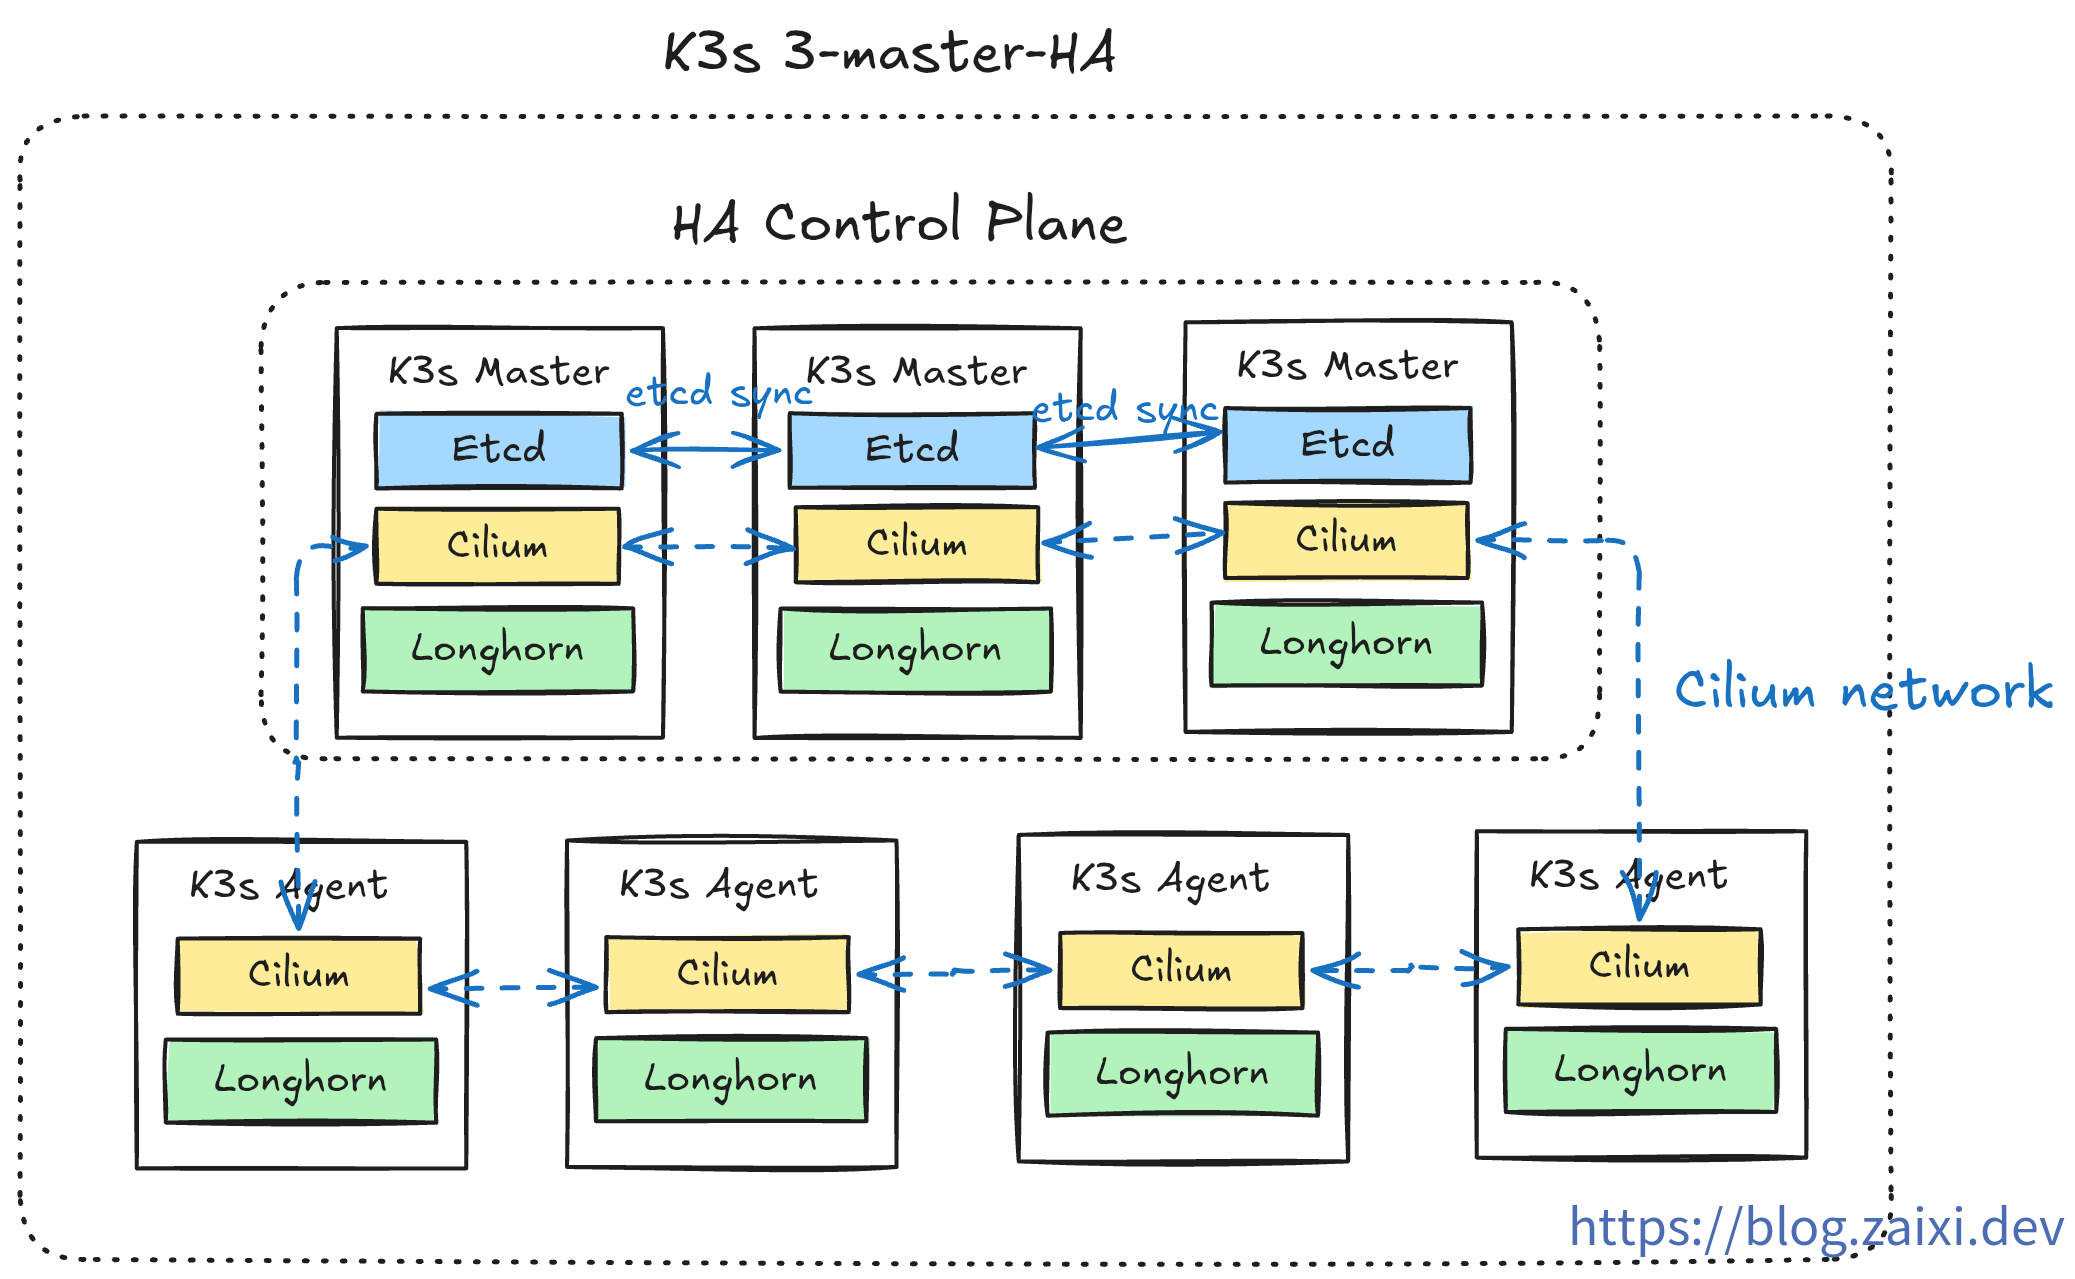
Deployment Planning
k3s installs a streamlined set of components by default. To meet production-level requirements, we need to plan in advance which modules to keep or replace. The following table shows the recommended strategy:
| Component Type | k3s Default | Replacement | Reason | k3sup Disable Parameter |
|---|---|---|---|---|
| Container Runtime | containerd | - | Keep default | - |
| Data Storage | SQLite / etcd | - | SQLite for single node, etcd for cluster | - |
| Ingress Controller | Traefik | Nginx Ingress / Others | Team familiarity, different feature requirements | --disable traefik |
| LoadBalancer | Service LB (Klipper-lb) | External load balancer | Cloud provider (e.g., Cloudflare) load balancing is more mature | --disable servicelb |
| DNS | CoreDNS | - | Keep default | - |
| Storage Class | Local-path-provisioner | Longhorn | Distributed storage, high availability, backup capability | --disable local-storage |
| CNI | Flannel | Cilium | eBPF performance, network policies, observability | --flannel-backend=none --disable-network-policy |
Environment Preparation
Required Tools
Before building the cluster, you need to prepare three CLI tools: k3sup, kubectl, and Helm. Please refer to their respective official documentation for installation. After installation, you can verify with commands like k3sup version, kubectl version, helm version, etc.

Server Requirements
Prepare at least three cloud servers (example environment uses Ubuntu 24.04) as a minimal three-node highly available control plane (recommended configuration ≥ 4C4G). Record each node's IP in advance, confirm SSH public keys are distributed, and know the local private key path, which will be used in subsequent steps.
Deploying the Initial Control Plane
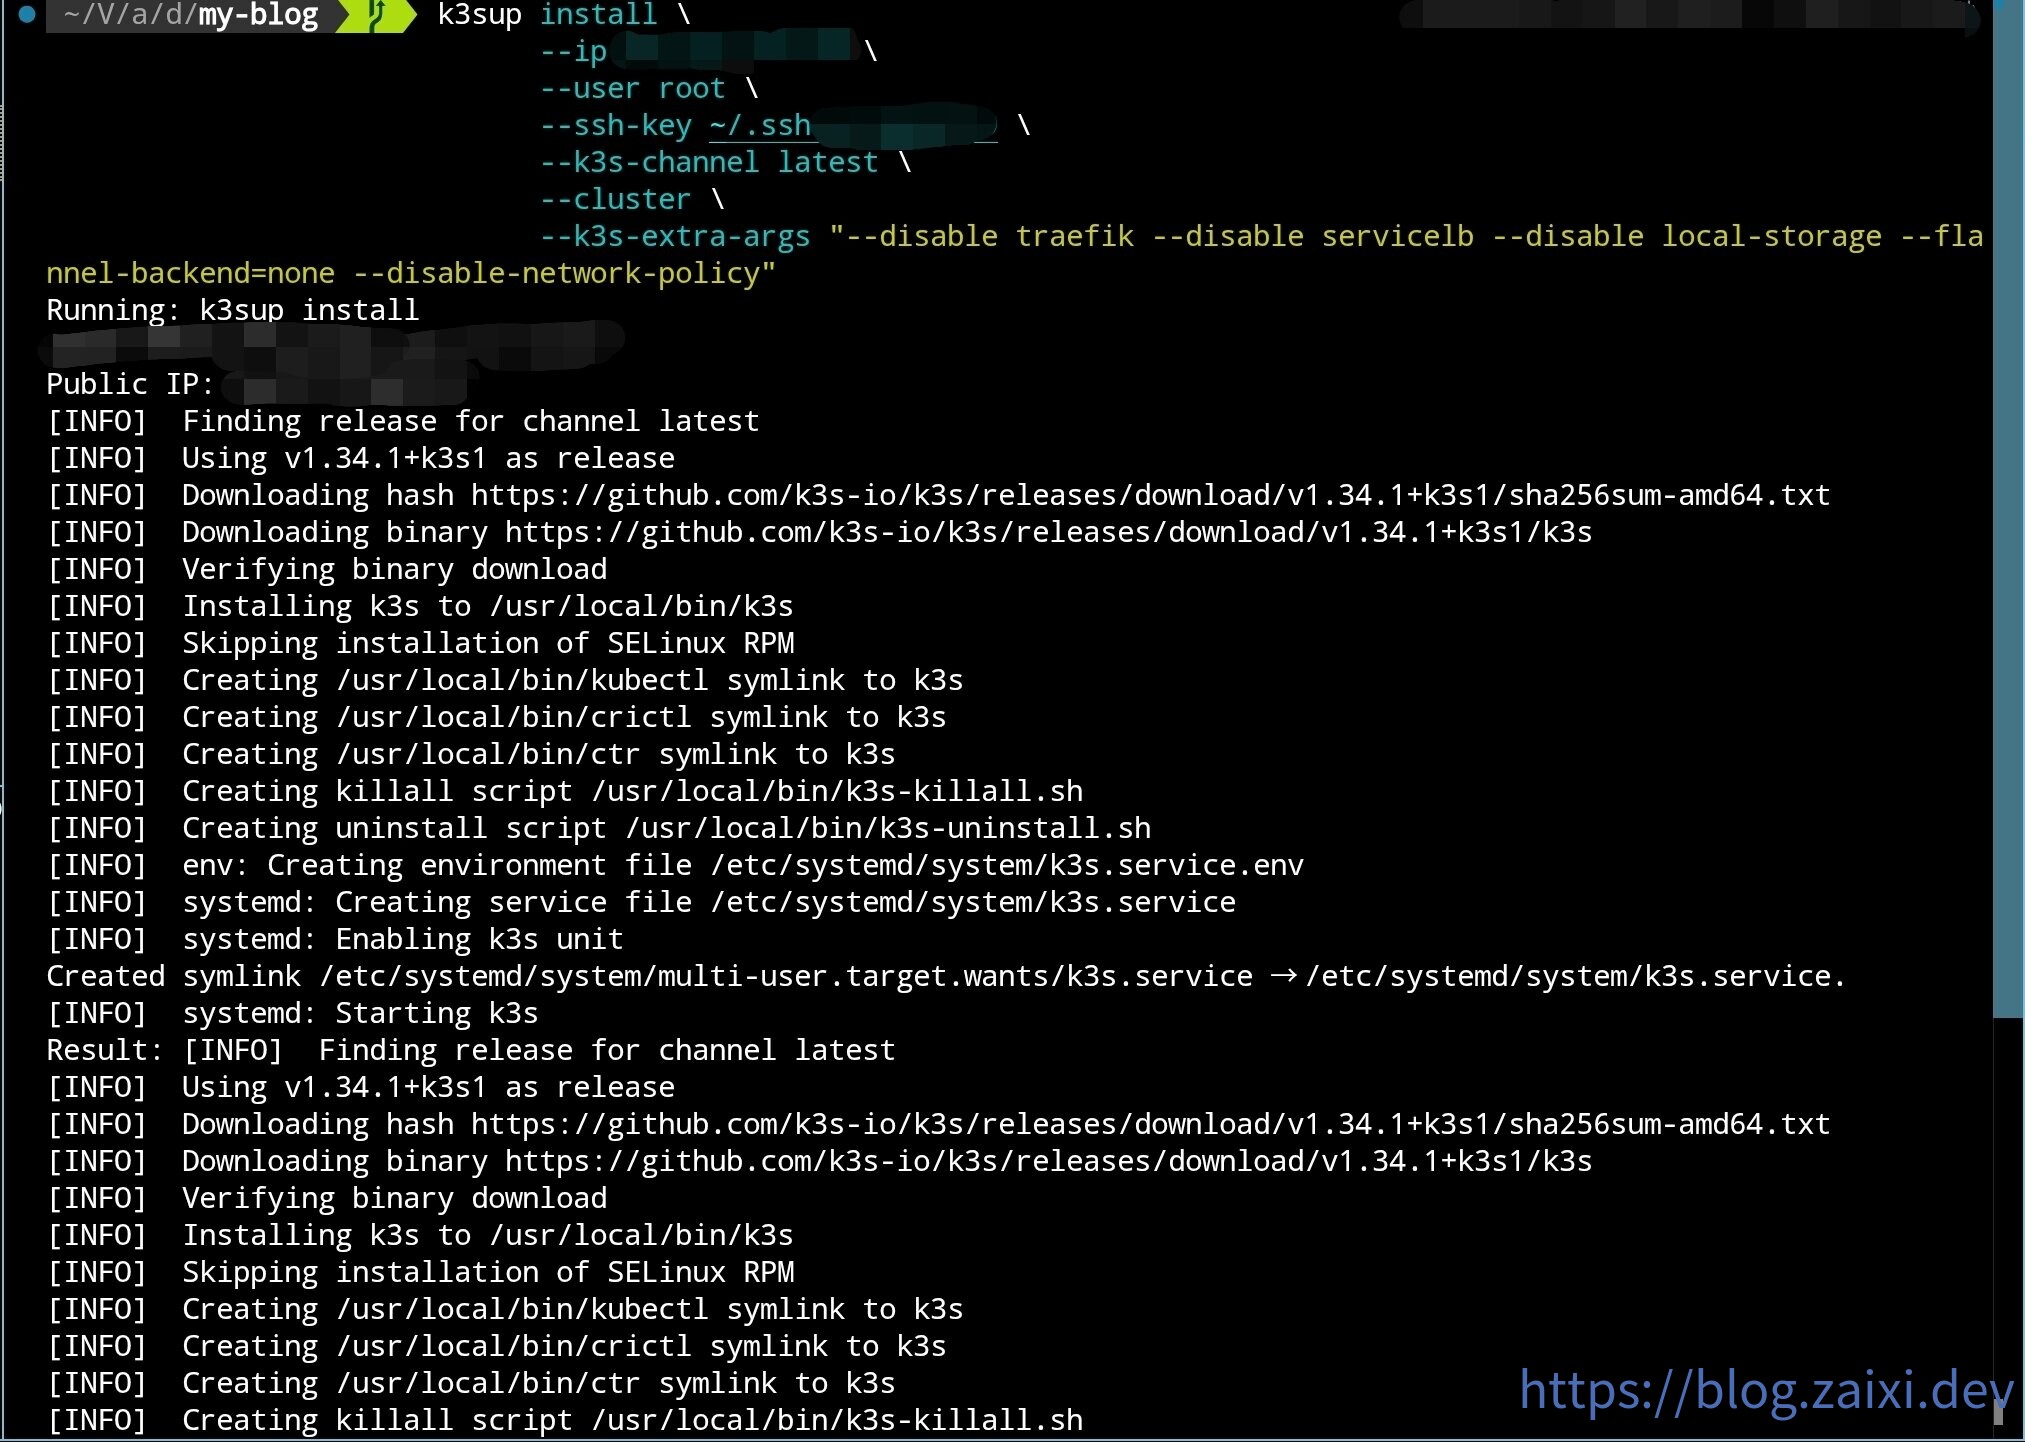
Use k3sup to deploy the initial control node:
k3sup install \
  --ip <initial_node_IP> \
  --user root \
  --ssh-key <key_location> \
  --k3s-channel latest \
  --cluster \
  --k3s-extra-args "--disable traefik --disable servicelb --disable local-storage --flannel-backend=none --disable-network-policy"
As shown in the figure:
After installation, k3sup will automatically copy the kubeconfig to the current directory. While you can use this configuration directly, a more robust approach is to merge it with your existing configuration file.
Merging kubeconfig
- Backup your current kubeconfig (default location
~/.kube/config):
cp ~/.kube/config ~/.kube/config.backup
fish shell (for reference only):
cp $KUBECONFIG {$KUBECONFIG}.backup
- Merge old and new kubeconfig into a single flat file:
KUBECONFIG=~/.kube/config:./kubeconfig kubectl config view --flatten > ~/.kube/config.new
fish shell (for reference only):
KUBECONFIG=$KUBECONFIG:./kubeconfig kubectl config view --flatten > kubeconfig-merged.yaml
- After verifying the new file is correct, overwrite the old configuration:
mv ~/.kube/config.new ~/.kube/config
fish shell:
mv ./kubeconfig-merged.yaml $KUBECONFIG
- Verify the new context is active:
kubectl config get-contexts
kubectl config use-context default
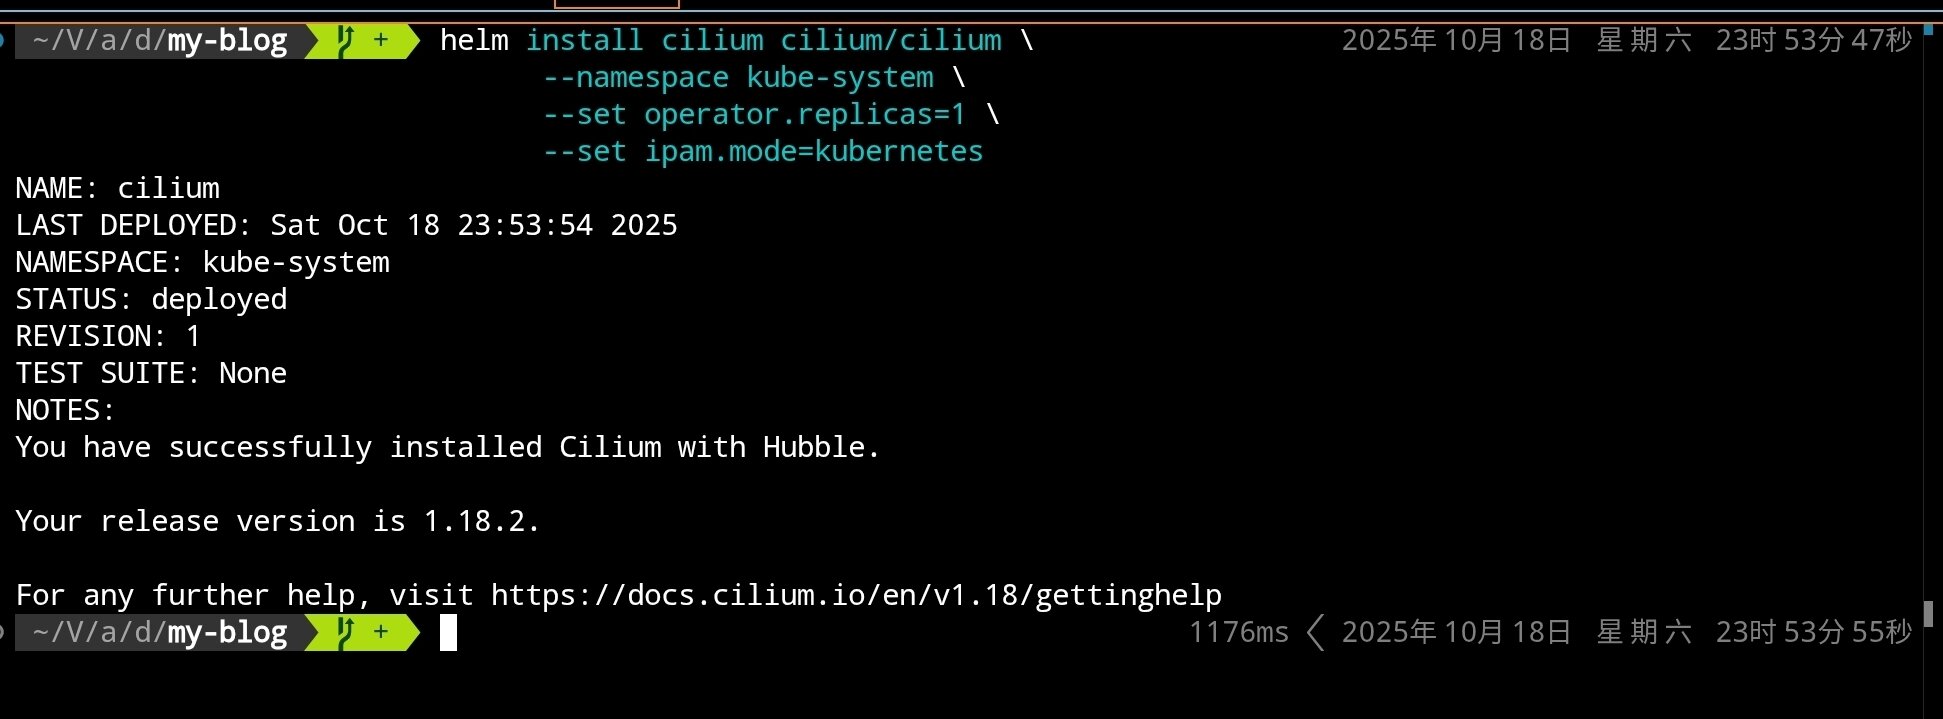
Installing Cilium (Replacing Flannel)
When installing k3s, we disabled the default CNI (Flannel), so nodes cannot communicate yet. Deploy Cilium as planned to provide networking and network policy capabilities.
Install Cilium using Helm:
# Add Cilium Helm repository
helm repo add cilium https://helm.cilium.io/

# Update Helm repositories
helm repo update

# Install Cilium CNI (single replica, default mode)
helm install cilium cilium/cilium \
  --namespace kube-system \
  --set operator.replicas=1 \
  --set ipam.mode=kubernetes
If kube-proxy is already disabled in the cluster, you can additionally add
--set kubeProxyReplacement=strict. This tutorial keeps the default value for broader compatibility.
After execution, you should see:

Wait for Cilium components to start:
# Check Cilium Pod status
kubectl get pods -n kube-system -l k8s-app=cilium

# Check node status (should change from NotReady to Ready)
kubectl get nodes

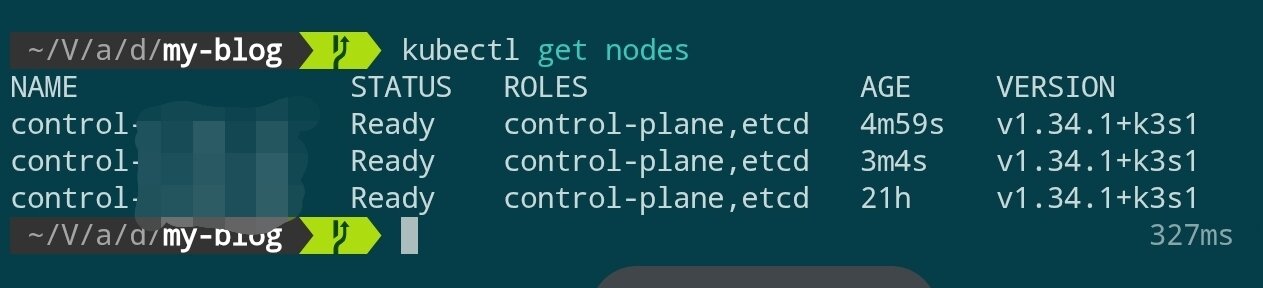
After switching to Cilium, nodes should change from NotReady to Ready. Next, use k3sup to join the other two control nodes.
Scaling the Control Plane
To achieve high availability, we need at least 3 control nodes. Use the following command to join the second control node:
k3sup join \
  --ip <second_node_IP> \
  --user root \
  --ssh-key <key_location> \
  --server-ip <initial_node_IP> \
  --server \
  --k3s-channel latest \
  --k3s-extra-args "--disable traefik --disable servicelb --disable local-storage --flannel-backend=none --disable-network-policy"
Join the third control node using the same method:
k3sup join \
  --ip <third_node_IP> \
  --user root \
  --ssh-key <key_location> \
  --server-ip <initial_node_IP> \
  --server \
  --k3s-channel latest \
  --k3s-extra-args "--disable traefik --disable servicelb --disable local-storage --flannel-backend=none --disable-network-policy"
After waiting a few minutes, check the cluster status:
kubectl get nodes
When all three control nodes are in Ready state, the control plane setup is complete.
Installing Nginx Ingress Controller
Replace k3s's default Traefik with Nginx Ingress Controller:
# Add Nginx Ingress Helm repository
helm repo add ingress-nginx https://kubernetes.github.io/ingress-nginx
helm repo update

# Install Nginx Ingress Controller (may take a while)
helm install ingress-nginx ingress-nginx/ingress-nginx \
  --namespace ingress-nginx \
  --create-namespace \
  --set controller.hostPort.enabled=true \
  --set controller.hostPort.ports.http=80 \
  --set controller.hostPort.ports.https=443 \
  --set controller.service.type=ClusterIP
kubectl get pods -n ingress-nginx
kubectl get svc -n ingress-nginx
Since we enabled hostPort, the Service type will show as ClusterIP and will not automatically allocate external addresses from cloud providers, for example:
NAME                                 TYPE        CLUSTER-IP      EXTERNAL-IP   PORT(S)          AGE
ingress-nginx-controller             ClusterIP   10.43.25.32     <none>        80/TCP,443/TCP   1d
ingress-nginx-controller-admission   ClusterIP   10.43.184.196   <none>        443/TCP          1d
The ingress entry is actually each control node's public IP, which can be confirmed via kubectl get nodes -o wide or directly from the cloud server panel. You can use this IP when configuring Cloudflare DNS later.

Installing Longhorn Distributed Storage
Longhorn is a cloud-native distributed block storage system developed by Rancher, providing enterprise-grade features like high availability, backups, and snapshots. Compared to k3s's default local-path-provisioner, Longhorn supports persistent storage across nodes.
Prerequisites Check
Before installing Longhorn, ensure each node has the necessary dependencies. If you want to handle this in batch with Ansible, refer to the example below:
# Execute on each node (via SSH)
# Check and install open-iscsi
apt update
apt install -y open-iscsi nfs-common

# Start and enable on boot
systemctl enable --now iscsid
systemctl status iscsid
If you want to use Ansible for batch installation of dependencies, refer to the following task snippet:
---
- name: Setup K3s nodes with Longhorn dependencies and CrowdSec
  hosts: k3s
  become: true
  vars:
    crowdsec_version: "latest"

  tasks:
    # ============================================
    # Longhorn Prerequisites
    # ============================================
    - name: Install Longhorn required packages
      ansible.builtin.apt:
        name:
          - open-iscsi          # iSCSI support for volume mounting
          - nfs-common          # NFS support for backup target
          - util-linux          # Provides nsenter and other utilities
          - curl                # For downloading and API calls
          - jq                  # JSON processing for Longhorn CLI
        state: present
        update_cache: true
      tags: longhorn

    - name: Enable and start iscsid service
      ansible.builtin.systemd:
        name: iscsid
        enabled: true
        state: started
      tags: longhorn

    - name: Load iscsi_tcp kernel module
      community.general.modprobe:
        name: iscsi_tcp
        state: present
      tags: longhorn

    - name: Ensure iscsi_tcp loads on boot
      ansible.builtin.lineinfile:
        path: /etc/modules-load.d/iscsi.conf
        line: iscsi_tcp
        create: true
        mode: '0644'
      tags: longhorn

    - name: Check if multipathd is installed
      ansible.builtin.command: which multipathd
      register: multipathd_check
      failed_when: false
      changed_when: false
      tags: longhorn

    - name: Disable multipathd if installed (conflicts with Longhorn)
      ansible.builtin.systemd:
        name: multipathd
        enabled: false
        state: stopped
      when: multipathd_check.rc == 0
      tags: longhorn
Deploying Longhorn
Install Longhorn using Helm:
# Add Longhorn Helm repository
helm repo add longhorn https://charts.longhorn.io
helm repo update

# Install Longhorn (may take a while). Note: to save disk space, only single replica is set here. Adjust according to your needs
helm install longhorn longhorn/longhorn \
  --namespace longhorn-system \
  --create-namespace \
  --set defaultSettings.defaultDataPath="/var/lib/longhorn" \
  --set persistence.defaultClass=true \
  --set persistence.defaultClassReplicaCount=1
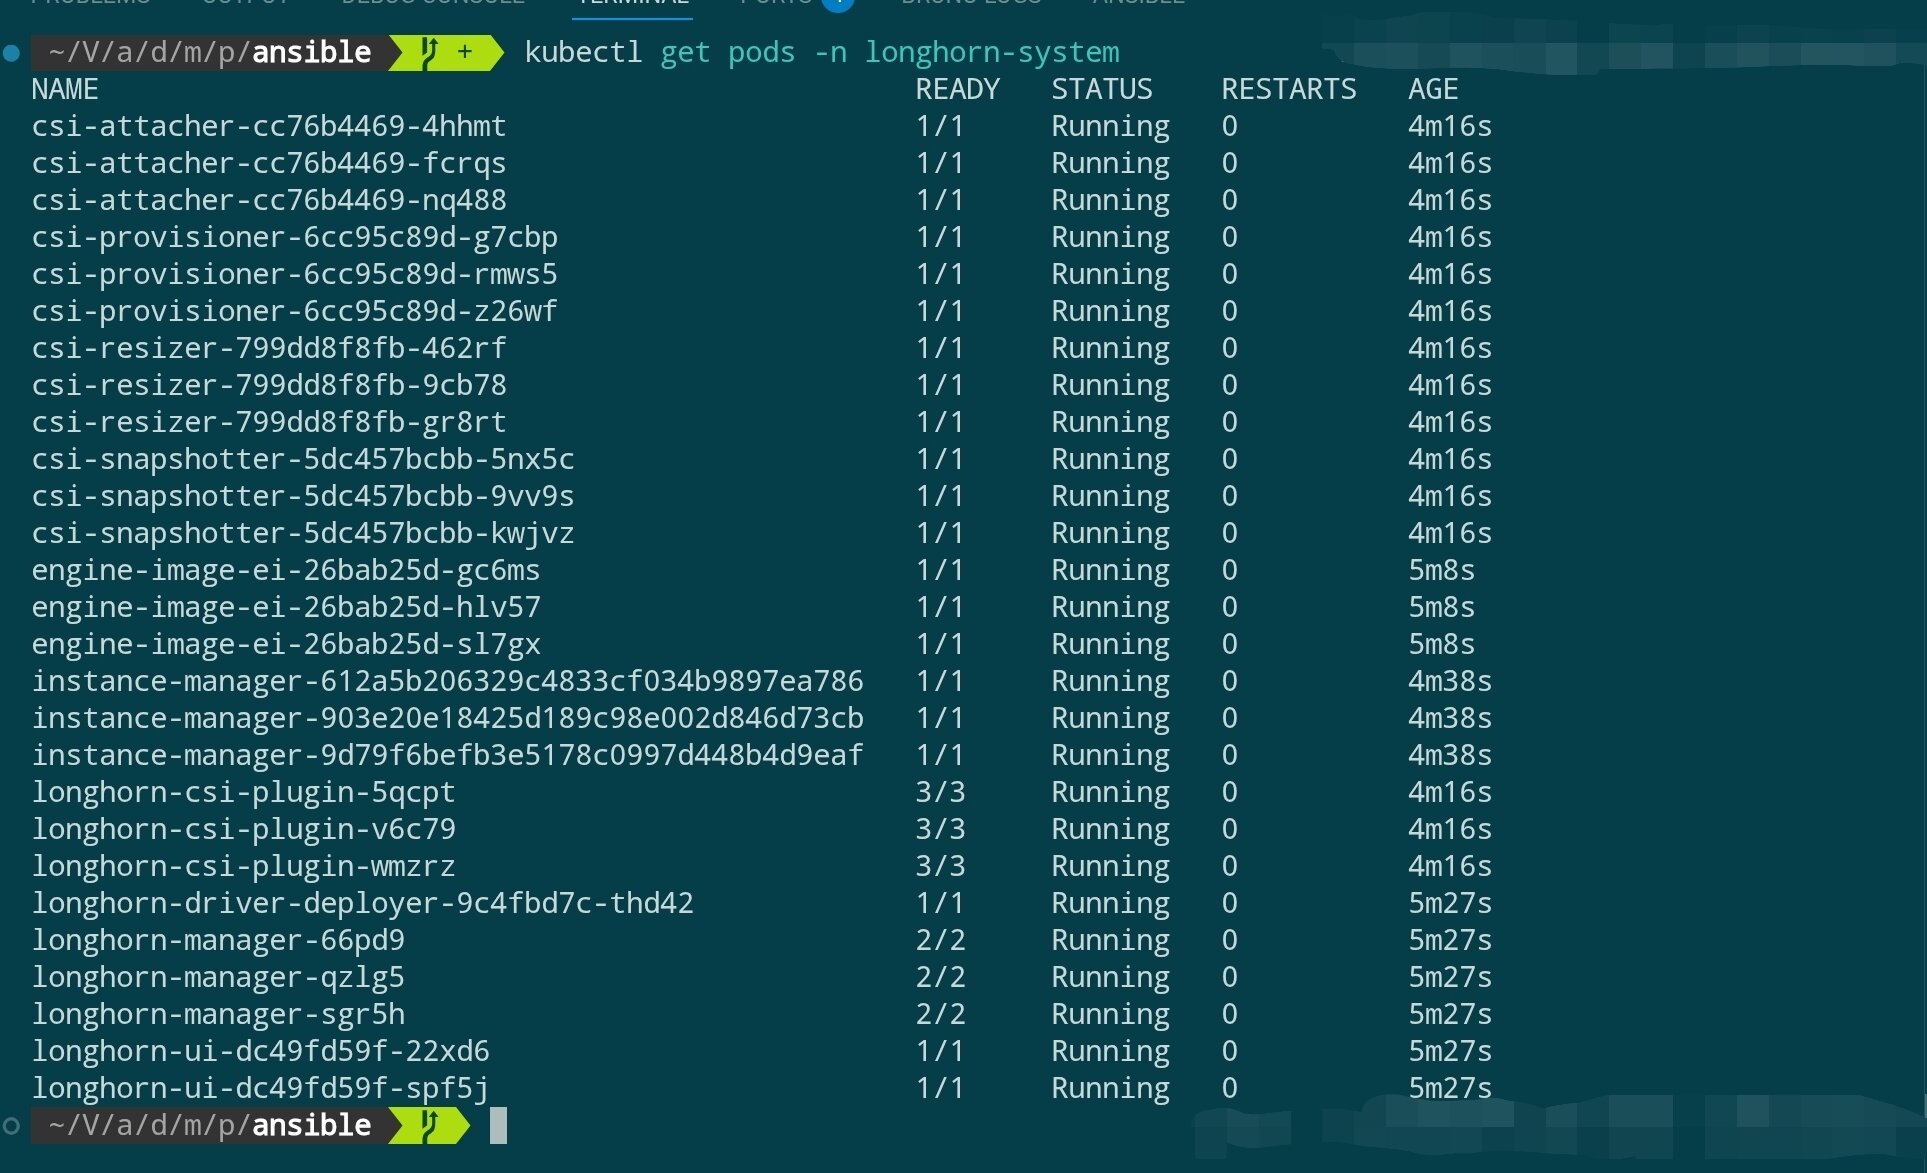
Wait for Longhorn components to start:
# Check Longhorn component status
kubectl get pods -n longhorn-system

# Check StorageClass
kubectl get storageclass

Accessing Longhorn UI (Optional)
Longhorn provides a Web UI for managing storage volumes. You can temporarily access it via port forwarding:
# Port forward to local machine
kubectl port-forward -n longhorn-system svc/longhorn-frontend 8081:80

# Access http://localhost:8081 in your browser
After viewing, press
Ctrl+Cin the terminal to stop port forwarding and avoid continuously occupying the local port.
Joining Agent Nodes
So far, we have built a 3-node highly available control plane. In production environments, we don't want to run actual applications on control-plane nodes (which would consume resources of core components like API Server and etcd).
Therefore, we need to join dedicated Agent nodes (also called Worker nodes) for running workloads (Pods).
Installing Prerequisites
Like control-plane nodes, Agent nodes also need to meet Longhorn's dependencies (if you want these nodes to schedule and store persistent volumes).
Before joining, execute the following commands on all Agent nodes:
# Execute on each Agent node (via SSH)
apt update
apt install -y open-iscsi nfs-common

# Start and enable on boot
systemctl enable --now iscsid
Executing the Join Command
The command to add Agent nodes is almost identical to adding control-plane nodes, but with two key differences: do not use the --server flag and no extra parameters.
k3sup join \
  --ip <AGENT_node_IP> \
  --user root \
  --ssh-key <key_location> \
  --server-ip <any_Control_node_IP> \
  --k3s-channel latest
Verifying Node Status
You can join multiple Agent nodes at once. After adding, wait a few minutes for Cilium and Longhorn components to automatically schedule to new nodes.
Use kubectl to check cluster status:
kubectl get nodes -o wide
You should see the newly joined nodes with ROLE column showing <none> (in k3s, <none> represents the agent/worker role).
At the same time, you can monitor whether Cilium and Longhorn Pods successfully start on new nodes:
# Cilium agent should start on new nodes
kubectl get pods -n kube-system -o wide

# Longhorn instance-manager should also start on new nodes
kubectl get pods -n longhorn-system -o wide
At this point, the cluster has a highly available control plane and worker nodes for running applications.
Installing Argo CD (GitOps Continuous Delivery)
To give the cluster declarative continuous delivery capabilities, we can install Argo CD, which automatically syncs Kubernetes manifests from Git repositories to the cluster. Combined with the Cilium, Ingress, Longhorn and other components deployed earlier, this forms a complete GitOps workflow.
Installation Steps
# Add Argo Helm repository and update index
helm repo add argo https://argoproj.github.io/argo-helm
helm repo update

# Install Argo CD in the argocd namespace (uses ClusterIP Service by default)
helm install argocd argo/argo-cd \
  --namespace argocd \
  --create-namespace \
  --set controller.replicas=2 \
  --set redis-ha.enabled=false \
  --set server.service.type=ClusterIP
The parameters above mean:
argocd: The name of the release to install. Subsequent upgrades/uninstalls depend on this name.argo/argo-cd: Use theargo-cdchart from theargoHelm repository.--namespace argocd: Install all resources to theargocdnamespace.--create-namespace: Automatically create the namespace if it doesn't exist.--set controller.replicas=2: Set Argo CD controller replicas to 2 for improved high availability.--set redis-ha.enabled=false: Disable Redis HA. Single instance is sufficient for most development/test scenarios.--set server.service.type=ClusterIP: Use ClusterIP type for server service. We'll expose external access via Ingress later.
After installation, wait for all components to be ready:
kubectl get pods -n argocd
You should see output similar to the following, indicating all core components have started successfully:
NAME                                                READY   STATUS      RESTARTS   AGE
argocd-application-controller-0                     1/1     Running     0          30s
argocd-application-controller-1                     1/1     Running     0          17s
argocd-applicationset-controller-6bf5957996-xnn7c   1/1     Running     0          30s
argocd-dex-server-7cb4b74df8-vqkdv                  1/1     Running     0          30s
argocd-notifications-controller-5cbffcc56d-9gntp    1/1     Running     0          30s
argocd-redis-b5f4d9475-584fs                        1/1     Running     0          30s
argocd-redis-secret-init-sggs2                      0/1     Completed   0          47s
argocd-repo-server-7687bd88c6-4ksfp                 1/1     Running     0          30s
argocd-server-67ccc4d44c-6th5p                      1/1     Running     0          30s
Where:
argocd-application-controller-*: Responsible for syncing Application resource status. We set two replicas for improved availability.argocd-applicationset-controller: Handles ApplicationSet CRD orchestration.argocd-dex-server: Provides Dex authentication service.argocd-notifications-controller: Implements notification and alerting capabilities.argocd-redis-*: Argo CD's built-in Redis for caching cluster state (redis-secret-initJob inCompletedstate is normal).argocd-repo-server: Handles Git repository sync and template rendering.argocd-server: Provides Web/UI and gRPC API.
When all Pod statuses are Running or Completed, Argo CD installation is successful and you can proceed to configure access entry or application sync.
Accessing Web UI
Since we've already deployed ingress-nginx, we can expose Argo CD UI via Ingress (replace argocd.example.com with your own domain or temporary hosts):
# argocd-ingress.yaml
apiVersion: networking.k8s.io/v1
kind: Ingress
metadata:
  name: argocd-server-ingress
  namespace: argocd
  annotations:
    nginx.ingress.kubernetes.io/backend-protocol: "HTTPS"
spec:
  ingressClassName: nginx
  rules:
    - host: argocd.example.com
      http:
        paths:
          - path: /
            pathType: Prefix
            backend:
              service:
                name: argocd-server
                port:
                  number: 443
kubectl apply -f argocd-ingress.yaml
First login requires the initial admin password, which can be obtained and changed with the following command:
kubectl -n argocd get secret argocd-initial-admin-secret -o jsonpath="{.data.password}" | base64 --decode
Then access https://argocd.example.com and login with username admin. It's recommended to change the password immediately after first login or configure SSO, and create your first Application via Git repository to start your GitOps workflow.
If you use Cloudflare to host your domain, you can complete domain resolution with the following steps:
- Replace
argocd.example.comin the Ingress example with your actual domain hosted on Cloudflare - In Cloudflare Console → DNS → Add an
Arecord with the name as the subdomain above and value as the cluster ingress public IP. If Ingress Controller hashostPortenabled, the ingress is any control node's public IP; if using external load balancing, fill in the corresponding load balancer address. - Optionally enable Cloudflare proxy (orange cloud) as needed. If enabled, it's recommended to configure trusted certificates for Argo CD (e.g., using cert-manager to request Let's Encrypt).
- After completing resolution, wait for DNS to propagate and you can access Argo CD UI through the domain provided by Cloudflare. For automatic resolution management, you can combine external-dns + Cloudflare API Token to achieve fully automatic GitOps domain sync.
Next Steps
【教程】从零开始构建企业级高可用 PostgreSQL 集群